- All
- Product Name
- Product Keyword
- Product Model
- Product Summary
- Product Description
- Multi Field Search

Views: 0 Author: Site Editor Publish Time: 2026-10-16 Origin: Site
Installing heavy-duty storage requires absolute precision. Structural integrity dictates warehouse safety. A single misaligned column can cause catastrophic inventory loss. Misalignment, incorrect anchoring, or improper load distribution during installation leads directly to rack failure. This creates operational downtime and severe safety liabilities. You cannot afford to guess during assembly. A systematic, engineering-aligned approach is mandatory. You must evaluate the floor slab, prepare the layout, and install the components sequentially. This ensures compliance, safety, and long-term scalability. Proper execution transforms raw steel into a reliable storage asset. We rely on strict field-tested protocols to prevent deflection and column twist. You will learn how to handle base leveling, cross-bracing, and arm attachment correctly. Following these steps guarantees your storage infrastructure handles maximum capacity without compromising the surrounding facility.
Pre-installation load calculation (measuring load size, arm length, lateral spacing, and column capacity) and floor slab evaluation are non-negotiable prerequisites for a safe build.
Configuration choices—such as opting for cantilever racking double sided versus single sided—dictate aisle spacing, base anchoring requirements, and overall warehouse flow.
Strict adherence to installation sequencing—from base leveling to cross-bracing and arm attachment—prevents structural deflection and column twist.
Auditing components prior to assembly (especially when installing used racking) and adhering to manufacturer load limits mitigate long-term operational risks and ensure OSHA/local code compliance.
You must calculate precise load specifications before drilling a single hole. Guessing capacities leads to structural collapse. Follow this four-step methodology to engineer a safe build.
Measure Load Size and Weight: Calculate the exact load depth, length, and weight per arm. You must know the maximum weight of the materials you plan to store. Overloading arms causes immediate metal fatigue. Document the heaviest bundle of lumber, pipe, or steel you handle. Divide this total weight by the number of arms supporting the load. This gives you the required capacity per arm.
Determine Arm Length: The arm length must never exceed the base length. This rule maintains a safe center of gravity. If your load depth is 48 inches, you need a 48-inch arm. Consequently, the base must be at least 48 inches long. Extending loads past the tip of the arm shifts the center of gravity forward. This creates a severe tipping hazard.
Determine Lateral Spacing: Calculate the correct center-to-center column spacing. This prevents load deflection. Long materials like lumber or PVC piping will sag if unsupported. Measure the flexibility of your inventory. Place wooden blocks on the floor at various distances. Rest your material on the blocks. Adjust the spacing until the material remains perfectly straight. This distance dictates your column spacing.
Determine Column Capacity: Factor in the total weight of all arms per column. Add a safety margin for dynamic loading. Dynamic loading occurs when a forklift drops a load roughly onto the arms. The column must support the aggregate weight of every fully loaded arm attached to it. Always consult the manufacturer's capacity charts to verify your calculations.
Use the following baseline measurements to estimate your total load requirements before finalizing your engineering drawings. Always weigh your specific inventory to confirm these estimates.
Material Type | Standard Dimensions | Approximate Weight |
|---|---|---|
Lumber (Pine) | 2x4x16 bundle (approx. 200 pieces) | 2,500 lbs |
Steel Pipe | 4-inch diameter, 20-foot length | 215 lbs per pipe |
PVC Pipe | 4-inch diameter, 20-foot length | 40 lbs per pipe |
Steel Plate | 4-foot x 8-foot x 1/2-inch thick | 650 lbs per plate |
Warehouse layout dictates your configuration strategy. You must evaluate single-sided versus cantilever racking double sided layouts. Single-sided units sit flush against walls. Double-sided units create center aisles. Your choice depends on forklift turning radius, aisle width requirements, and inventory volume. Double-sided configurations maximize storage density in open floor plans. Single-sided units utilize dead wall space effectively.
Environmental conditions also dictate material choices. Identify when to specify cantilever racking galvanised components. Standard powder-coated steel rusts quickly outdoors. Galvanized steel resists corrosion in high-humidity, outdoor, or chemical environments. Hot-dipped galvanized finishes withstand harsh weather and protect the structural integrity of the steel over decades.
Your concrete floor is the foundation of the entire structure. A weak slab compromises the strongest steel. Assess the concrete PSI and slab thickness before installation. Most heavy-duty systems require a minimum of 3,000 PSI concrete. The slab must be thick enough to accept heavy-duty wedge anchors without cracking. Local seismic zone requirements often dictate specific anchor depths and diameters.
Identify underground utilities before drilling. Hitting a conduit or water line causes massive disruptions. Ensure the slab meets the rack manufacturer's minimum engineering specifications. If the floor is inadequate, you must pour concrete footings. Never install heavy racks on asphalt or damaged concrete. If you encounter rebar during drilling, you must consult the structural engineer to determine if you can core through the rebar or if you must relocate the column.
Inspect all components prior to assembly. This is mandatory when installing used racking. Follow this audit checklist before moving any steel onto the warehouse floor:
Check for metal fatigue, rust, and bent arms.
Look closely at the welds on the bases and columns for hairline fractures.
Ensure all locking pins, safety keepers, and hardware are present and undamaged.
Verify that the hole pitch on the columns matches the connection points on the arms.
Confirm that all components share the exact same manufacturer brand and steel gauge.
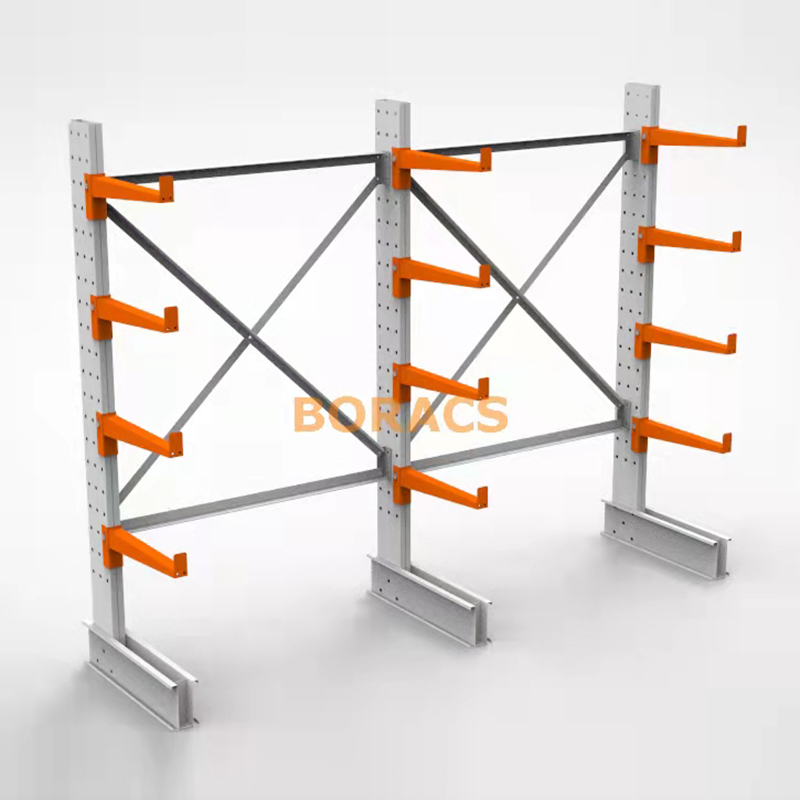
The base and upright column form the backbone of the structure. A strict engineering relationship exists between base length and arm length. The base must always equal or exceed the arm length. This prevents the system from tipping forward under a heavy load. The base anchors directly to the floor and transfers the entire weight of the system into the concrete.
Understand your column capacity and height restrictions. Columns feature specific hole spacing, known as pitch. A tighter pitch allows for more granular arm adjustability. Ensure your warehouse ceiling height accommodates the column height, leaving adequate clearance for fire sprinklers, HVAC ducts, and lighting fixtures. You must also account for the maximum lift height of your specific forklift fleet.
Bracing sets dictate the exact center-to-center spacing of the uprights. They connect the columns and provide lateral stability. Without bracing, the columns would fold like dominoes. Horizontal braces establish the distance between columns. Diagonal braces, often configured as X-bracing, prevent the structure from swaying side to side.
The structural role of X-bracing cannot be overstated. It locks the columns into a rigid framework. You must install bracing exactly according to the manufacturer's schematic. Missing or loose bracing leads to catastrophic failure during forklift impacts or seismic events. Never substitute factory bracing with unapproved steel angle iron or strut channel.
Arms support the actual inventory. You must choose between straight arms and inclined arms. Straight arms work perfectly for flat loads like lumber, steel plates, or sheet goods. Inclined arms feature a slight upward pitch. This prevents cylindrical loads like PVC pipe or steel tubing from rolling off the front.
Compare pin-lock connections with bolted arm connections. Pin-lock systems allow for faster adjustability. You simply remove a steel pin, adjust the arm height, and reinsert the pin. Bolted connections offer higher rigidity but require tools and more time to adjust. Many arms also feature load stops at the tips. These pipe stops provide a physical barrier to keep inventory secure. You must verify that the load stops are tall enough to contain the specific diameter of your stored materials.
Gather the correct tools before beginning the assembly process. Using improper tools damages the steel and compromises the anchor points.
Rotary hammer drill equipped with masonry bits matching the anchor diameter.
Calibrated torque wrench capable of reaching the manufacturer's specified foot-pounds.
Four-foot magnetic torpedo level and a high-visibility laser level.
Chalk line, 100-foot tape measure, and a large framing square.
Air compressor with a blow nozzle for clearing concrete dust from anchor holes.
Scissor lift or forklift for elevating bracing panels and heavy upright columns.
Start by sweeping the floor completely clean. Debris interferes with chalk lines and base plates. Cross-reference your physical warehouse layout with the manufacturer's CAD drawings. Verify that aisle widths accommodate your specific forklifts. Establish a precise baseline parallel to walls or existing aisles. Snap a long chalk line on the concrete to mark the front edge of the bases.
Mark the column centers along this baseline. Use the exact horizontal bracing lengths to determine the spacing. Measure diagonally between your marks to ensure the layout is perfectly square. Use the 3-4-5 squaring method to verify 90-degree angles at the end of the rows. Taking time to measure accurately here prevents massive headaches later. A crooked baseline results in a twisted racking system that will not accept the bracing panels properly.
Bring the bases and upright columns to the installation area. If you are using a modular, non-welded system, bolt the base to the upright column while it lies flat on the floor. Torque the bolts to the manufacturer's specifications. Stand the first two columns upright. Move them into position on your chalk marks.
Temporarily support these first two columns. They are highly unstable until braced. Use a forklift or heavy-duty straps to hold them vertical. Never leave unbraced columns standing unattended. A slight bump will knock them over, causing severe injury or damage. Assign one crew member to hold the column steady while another prepares the bracing.
Connect the first bracing panel between the initial two columns. This creates your starter bay. Attach the horizontal braces first to establish the correct distance. Then, install the diagonal X-bracing. Insert the bolts but do not fully tighten them yet. You need a little flexibility to square the bay.
Square and plumb the starter bay. Measure diagonally across the bracing panel. Adjust the columns until the diagonal measurements match exactly. Once square, tighten all bracing bolts to the manufacturer's torque specifications. Repeat this process sequentially for all add-on bays. Build the system one bay at a time down the chalk line. Never attempt to build multiple bays loosely and tighten them all at the end.
A perfectly level system is mandatory for safe operation. Check the vertical plumb of every column. Use a high-quality laser level or a long magnetic torpedo level. You must check plumb in two directions: front-to-back and side-to-side. Uneven warehouse floors will cause the columns to lean.
Insert engineered steel shims under the base plates to correct any lean. Never use wood, plastic, or unapproved materials for shimming. Stack the steel shims directly under the upright column footprint. Ensure the base plate rests solidly on the shims. The total height of the shim stack must never exceed the length of the anchor bolt threads. A leaning column drastically reduces the weight capacity of the entire cantilever racking system.
Do not drill anchor holes until the entire row is assembled, plumbed, and shimmed. Use the holes in the base plates as precise drilling templates. Drill straight down into the concrete using a rotary hammer equipped with the correct masonry bit. Clear the concrete dust from the holes using compressed air or a wire brush. Dust left in the hole prevents anchors from gripping properly and causes them to slip under load.
Install wedge anchors or epoxy anchors strictly per seismic engineering specifications. Drive the anchors through the base plate and shims into the concrete. Torque the anchors to the required foot-pounds using a calibrated torque wrench. Proper torquing ensures base rigidity and locks the system securely to the slab. Mark the top of each torqued anchor with a paint pen to visually confirm it has been tightened.
Set arm elevations based on your specific load heights and forklift clearance requirements. Start from the bottom and work your way up. Ensure the arms are level across the entire row. This allows long materials to rest evenly on multiple arms, preventing point-loading on a single connection.
Secure the arms using the provided locking pins or bolts. If using locking pins, ensure the safety keepers are fully engaged. Install optional end stops at the tips of the arms to secure cylindrical inventory. Double-check every connection point before applying any weight to the structure. Shake each arm manually to confirm it is seated correctly in the column pitch.
Installation failures often stem from poor bolt management. Over-tightening bracing bolts crushes the steel tubing and causes structural fatigue. Under-tightening allows the system to sway and eventually collapse. Mitigate this risk by utilizing calibrated torque wrenches. Strictly follow the torque values listed in the OEM installation manuals.
Another severe risk involves mismatched components. Installing arms longer than the base structure creates an immediate tipping hazard. Mixing incompatible brands compromises the engineering tolerances. Mitigate these risks through strict adherence to the engineered bill of materials. Conduct thorough pre-installation component audits to verify every part matches the approved design.
Symptom | Probable Cause | Corrective Action |
|---|---|---|
Column leaning forward | Overloaded arms or unshimmed base plate | Remove load immediately. Shim the base plate to achieve plumb. Verify load capacity. |
Bracing bolts vibrating loose | Improper initial torque or heavy forklift vibration | Retorque all bolts to OEM specifications. Apply industrial threadlocker to the bolt threads. |
Floor anchors pulling out | Weak concrete PSI or shallow embedment depth | Relocate the rack to a stronger slab area or pour new engineered concrete footings. |
Arms difficult to insert | Bent column pitch holes or mismatched arm brand | Inspect the column for damage. Verify the arm and column share the exact same manufacturer. |
Never assume the installation is perfect. Conduct a comprehensive visual inspection before loading inventory. Check all anchor points to ensure the nuts are tight and the bolts are fully seated. Verify that all shims remain securely in place under the base plates. Inspect every arm connection to confirm locking pins are engaged.
Apply test loads gradually. Place a light load on the lowest arms first. Monitor the structure for unexpected deflection, column twist, or base plate lifting. Slowly increase the weight up to the maximum engineered capacity. Listen for popping or groaning sounds from the steel. If the system shifts or twists, remove the load immediately and re-evaluate the bracing and anchors.
Warehouse needs change over time. You must know how to safely add bays to an existing structure. Adding bays requires matching the exact brand, column height, and bracing pitch of the original system. Never bolt a new brand onto an existing row. This compromises the original engineering and voids all safety warranties.
Evaluate trade-offs when modifying configurations. Converting a single-sided run to a double-sided run requires re-evaluating capacity limits. You must ensure the base is designed to accept arms on both sides. Adding arms to the back of a single-sided column changes the center of gravity. You must also verify that your forklift turning radiuses and aisle spaces can accommodate the new layout.
Installation is not a one-time event. Long-term safety requires rigorous maintenance. Establish routine checks for forklift impact damage. Forklifts frequently strike the bases and lowest arms. Even minor dents compromise structural integrity. Inspect the floor anchors regularly. Heavy forklift traffic causes vibrations that can loosen anchor nuts over time.
Check for bent arms and missing locking pins monthly. Remove any damaged components from service immediately. Document all inspections and repairs to maintain OSHA compliance. A proactive maintenance schedule extends the lifespan of your cantilever racking and protects your workforce from preventable accidents.
Execute the following steps immediately to finalize your storage project safely:
Verify your concrete slab meets the minimum 3,000 PSI requirement and check for underground utilities before drilling.
Conduct a physical deflection test with your heaviest and longest inventory to determine the exact center-to-center column spacing.
Audit all delivered steel components against the manufacturer's engineered drawings to confirm exact part numbers and quantities.
Schedule an independent safety inspection to verify anchor torque values and column plumbness prior to loading any inventory.
A: Column spacing depends entirely on the flexibility of your inventory. Spacing must prevent load deflection. Conduct a deflection test by supporting your material on blocks. Adjust the blocks until the material remains straight. That distance determines your maximum center-to-center column spacing.
A: Yes, but only if the upright column and base are engineered for double-sided use. You cannot simply bolt arms to the back of a single-sided specific column. Verify the manufacturer's engineering specifications before modifying the configuration.
A: Roll-formed racking uses cold-rolled sheet metal shaped into columns. It is lighter and suitable for medium loads. Structural racking uses hot-rolled structural steel. It offers significantly higher weight capacities and better resistance to forklift impacts.
A: Use galvanized steel for outdoor storage, freezers, or highly corrosive environments. The hot-dipped zinc coating prevents rust and degradation. Standard painted or powder-coated steel will quickly corrode when exposed to moisture or harsh weather conditions.
A: Measure the maximum depth of the material you plan to store. The arm length must equal or slightly exceed this depth. Never allow loads to overhang the tip of the arm, as this creates a severe tipping hazard.
A: Heavy-duty wedge anchors are standard for most installations. However, specific anchor diameter, embedment depth, and type are dictated by the rack manufacturer's engineering guidelines and local seismic codes.